As with all mechanical things, eventually the gears of a clock are inevitably brought to a halt by the sands of time. This presents the clock’s caretaker with a choice: fix the existing mechanisms or replace them?
Each option comes with its own set of challenges. Repairing or replacing an existing mechanism can be a very involved process and may necessitate laborious searches for out-of-production parts or the machining of custom components (which likely as not will need to be replaced regularly). Often, the simplest solution is to sidestep the hunt for antiques and upgrade the whole system with modern clockworks. Different models of clockworks and control systems do not necessarily interface with each other very well, so a system-wide upgrade is especially desirable for clocks with multiple faces.
Lumichron is occasionally called upon to provide such service for dated clocks in the field, either shipping parts directly to local personnel or loading up the tool-bag and venturing forth on a repair mission. When doing fieldwork, it is often helpful to do some reconnaissance beforehand if possible.

One sunny July morning this past summer saw Lumichron on-site at the Macatawa Express Central Holland Transfer Bus Station, in Holland, Michigan, installing new components on an impressive old four-faced post clock manufactured by The Verdin Company. The Holland Station was already home to a custom Lumichron bracket clock, and we were pleased to perform further service by bringing their old four-way up to time!

You never know what you might run into in an old clock; it is, therefore, imperative to pack the tool-bag thoroughly (including all the tools you think you probably won’t need), and maybe an extra ladder or two, when traveling for a job on-site. Being right down the road, Lumichron was able to perform a site visit prior to performing work to determine what tools might be needed to access the base (where the controls are located), and how the bezels, faces, and old components could be removed. The fasteners used and method of construction tend to vary somewhat from clock to clock depending on the manufacturer. (I should note also, for those who may attempt a similar job, to be sure of the location of the appropriate circuit breaker so that power to the clock can be cut off before starting work.)
Access: A quick note about removing bezels and clock faces: often the fastener holes are punched or drilled by hand, so they may vary somewhat from one piece to the next. It is important, therefore, if working on more than one side at a time, to always label not only which face goes where or which bezel goes to which face, but for bezels the orientation should also be labeled with respect to the 12:00 position. To avoid the confusion of parts not aligning properly during reassembly, it can be helpful to work on only one face at a time.
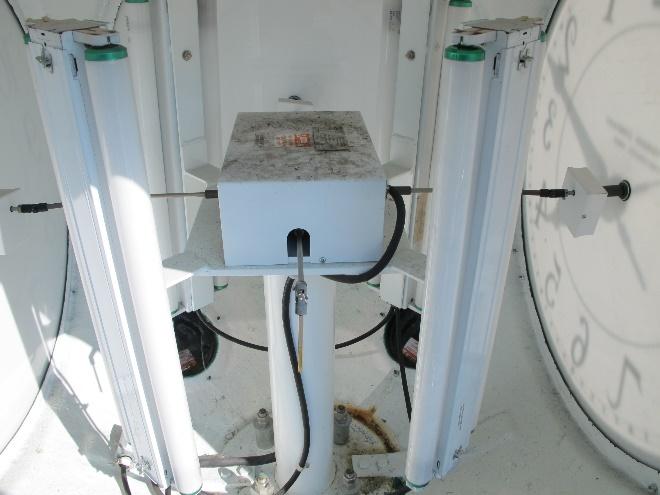
After setting up a suitable workstation, it was time for the task at hand. The old heart of this particular clock was what is called a four-way movement, in which a single drive train in the center is geared to transmit motion to four separate shafts, gear sets on each face and turn the hands on each face simultaneously.

This unit was controlled by a switch located in the base of the post, the switch having the following functions:
- Off: Cuts power to movement.
- Reg. Run: Normal running speed.
- Fast Set: Fast forwards the hands for adjustment.
Over time, the electric motor can wear out, especially if the unit is one requiring regular lubrication of the gears by means of an ‘oil-bath’ reservoir. After reviewing costs for re-building or replacement with fully automatic controls, it was decided to remove this unit and replace it with four impulse-drive movements, controlled by a Master Clock Controller located in the cavity at the base of the post which would reset all simultaneously after power interruptions and DST changes for hands-free operation.

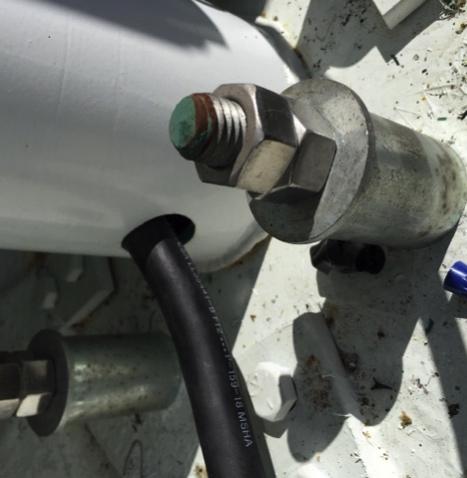
Removing the four-way movement was straightforward. The shafts are ‘slip-fit’ where they connect with the individual gear boxes of each face and can be wholly separated from the gear box simply by loosening a screw at the coupling point near the movement itself. After then removing two bolts, the whole movement can be pulled out without having to take off all four clock faces at once. Easy.
After taking out the old movement, the real challenge faced was how to feed a new set of cables for the updated components from the base and into the clock. The existing wiring consisted of a thick, ropelike cable which did not allow space for other cables to be run alongside it, and it did not have enough conductors for the new components.
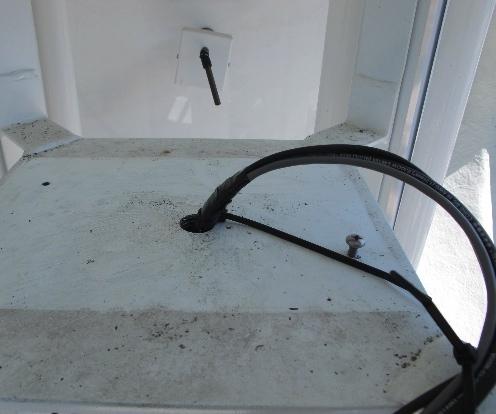
After drilling a hole in the top movement plate and peeking down into the tube, it was discovered that after entering the tube the cable bent up, then folded back down to pass through a skin-tight fitting at a slightly higher level than the hole the cable had entered. This height difference made it impractical to try feeding new via the same path.
However, it would certainly be possible to remove the existing cable by cutting it close to the pole and with much hauling and heaving pull it out from below.
New cables were fed straight down through the freshly drilled hole. (Note: The old cable was snug enough to allow the 180lb technician to dangle from it. Bring your tug-of-war gloves!) It would also likely be possible to use the old cable to pull new wires down through the post. In hindsight, this may be an easier option than drilling through the 3/8” steel plate.

With the new cables securely in place, the next step was simply to remove each dial one at a time and replace the gearbox and hands with new movements and hands.
Hands are affixed to the shafts of a clock movement via what are called “bushings”. Bushings are not always easily removeable from an old hand, and the shafts of various types of clock movements generally will be of different diameters, so it is typical when replacing an old movement, the hands will also have to be replaced.

After installing new movements came final wiring and affixing the GPS to the central tube inside the clock. The GPS antenna is able to “look out” through the plastic dials and catch signal from satellites to synchronize the quartz crystal of the master clock. We will cover this process in more detail in a future article. The tube is thick steel, so the simplest solution is to strap the antenna in place with cable-ties or similar.
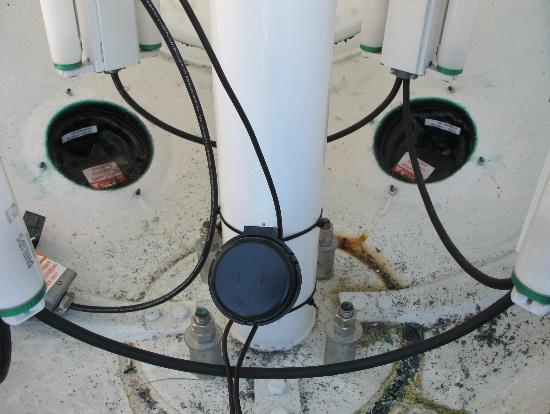

Moving down to the base, the old cable was disconnected and the switch removed, to be replaced by the Master Clock Controller.
With the new wiring and controller in place, the system was powered up and tested. When powering up and activating these particular movements, it is advisable to leave one face of the clock only loosely fastened so that adjustments can be made quickly if necessary.
If one of the movements lags 1 minute, ‘halt’ them at the controller, move the hand forward 1 minute using the small black slotted screw on the back of the movement, then switch the plug into the alternate set of pins on the back of the movement to reverse the polarity.
After adjustments, the clocks were set running and the only thing left to do was clean the crystals! Some of these old clocks have crystals made of acrylic, which can grow cloudy or discolored over time, but still an attempt should be made to leave a serviced clock looking lovely!
